The web server Nginx, which is reliable and fast, is used to host websites and web applications. You’ll discover that installing Nginx is a simple procedure. If you’ve decided to use Rocky Linux 8 as your server platform. This article will walk you through the steps required to install Nginx on Rocky Linux 8. Enabling you to swiftly launch your web services.
Nginx hosts some biggest and busiest websites on the internet. It is one of the most widely used servers all over. It is a versatile choice that can be utilized as a web server or reverse proxy. We’ll go over installing Nginx on your Rocky Linux 8 server. Configuring the firewall, and managing the Nginx process. Then setting up server blocks for serving several domains from a single server in this tutorial.
Requirements:
- Before beginning this guide, you should have a regular, non-root user account with sudo privileges set up on your server.
- Before finishing the last steps of this tutorial, you may also want to have registered a domain name. Start by logging in as the user account becomes accessible.
Install Nginx on Rocky Linux
Step 1: First of all Install Nginx in the Beginning.
Nginx may be installed using the DNF package manager with a single command because it is part of Rocky’s default repositories.
Use dnf install to install the nginx package:
sudo dnf install nginx
Enter y to indicate that you want to install nginx when prompted. Nginx and any necessary dependencies will then be installed on your server by dnf.
Run the following commands to enable and launch the web server after installation is complete:
sudo systemctl enable nginx
sudo systemctl start nginx
This will trigger an automated Nginx restart each time your server reboots. Now that your new web server should be operational. You should update the configuration of your firewall before testing it.
Step 2: Firewall Adjustment after Installation.
To enable external connections on your Nginx web server, which runs by default on port 80. If the firewalld firewall was configured as part of the initial server. Setup instructions for Rocky Linux 8, you must change the firewall settings.
To permanently enable HTTP connections on port 80, issue the following command:
sudo firewall-cmd --permanent --add-service=http
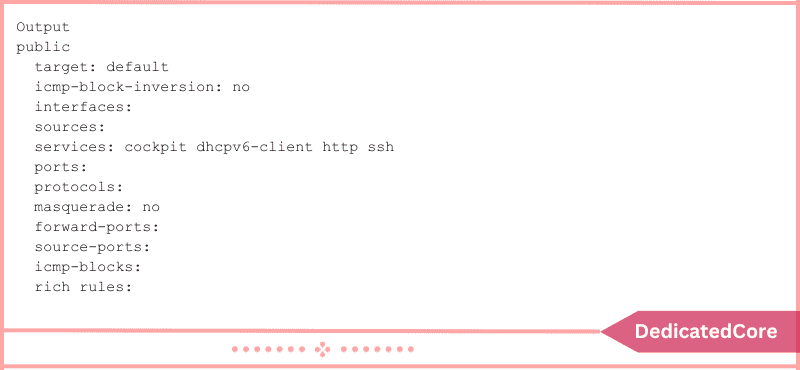
Run the following command to make sure the http firewall service was added properly:
sudo firewall-cmd --permanent --list-all
You’ll see the following output:
You must reload the firewall service for the modifications to take effect:
sudo firewall-cmd --reload
External users should now be able to access your web server.
Step 3: Checking your Web Server
Your web server ought to be operational at this time.
To confirm that the service is operational, use the systemctl status command:
systemctl status nginx
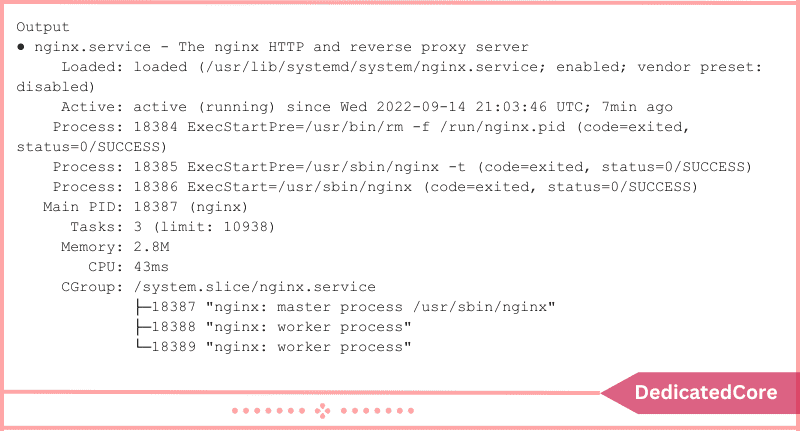
This result shows that the service launched properly. However, requesting a page from Nginx is the most effective approach to test this.
By going to your server’s IP address, you may visit the default Nginx landing page. To verify that the program is functioning as intended. If you are unaware of your server’s IP address, you can find it using the icanhazip.com service. Your public IP address will be displayed to you because it was obtained from another website:
curl -4 icanhazip.com
When you are aware of your server’s IP address, enter it as follows into your browser’s address bar:

If you are reading this, your server is operating normally and is ready for management.
Step 4: In the Step below Manage the Nginx Process.
Let’s go over some service management commands now that your web server is operational.
Use systemctl stop to terminate your web server:
sudo systemctl stop nginx
Use systemctl start to restart the web server once it has been stopped:
sudo systemctl start nginx
Use systemctl restart to halt, then restart, the service:
sudo systemctl restart nginx
Nginx can frequently reload without disconnecting connections if you are only making configuration changes. Use systemctl reload for this.
sudo systemctl reload nginx
You set up Nginx to launch automatically when the server boots earlier in this guide. Systemctl disable can be used to stop this behavior:
sudo systemctl disable nginx
If you want the service to restart upon boot, type:
sudo systemctl enable nginx
Step 5: Learning Important Nginx Files and Directories Now
After learning how to operate the Nginx service, you should spend some time getting acquainted with a few crucial directories and files.
Content
- /usr/share/nginx/html: The actual web content is provided from the /usr/share/nginx/html directory. Which by default simply contains the Nginx page you previously saw. By making changes to the Nginx configuration files, this can be adjusted.
Configuring the Server
- The directory for Nginx configuration is /etc/nginx. Here are all of the Nginx configuration files.
- The main Nginx configuration file is located in /etc/nginx/nginx.conf. To alter the overall settings of Nginx, modify this.
- /etc/nginx/conf.d/: The server block configuration files in this directory allow you to specify the websites that Nginx hosts. Each website is often contained in a separate file with the name of the website’s domain, such as your_domain.conf.
Client Logs
- /var/log/nginx/access.log: Unless Nginx is set otherwise, every request to your web server is recorded in this log file.
- /var/log/nginx/error.log: This log will contain any Nginx errors.
You should be prepared to set up the website to host one or more domains at this point.
Step 6: Setting up Server Blocks Here in Final Step {Optional}.
Server blocks, which are akin to virtual hosts in Apache. That can be used with the Nginx web server to organize configuration information. And host several domains on a single server. Server blocks are specified in .conf files found in /etc/nginx/conf.d on Rocky Linux 9. Your_domain will be the domain name we create. However, you should substitute your domain name here.
Rocky Linux 9’s Nginx is set up by default to serve files from the /usr/share/nginx/html directory. While this works fine for a single site, hosting many sites might make it difficult to manage. Instead of altering /usr/share/nginx/html, you should establish a directory structure under /var/www for your_domain website. If a client request doesn’t match any other sites, /usr/share/nginx/html will still be provided by default.
Use the -p parameter to establish any required parent directories. When creating the directory for your_domain:
sudo mkdir -p /var/www/your_domain/html
The $USER environment variable, which should belong to your current system user, should then be used to assign ownership of the directory:
sudo chown -R $USER:$USER /var/www/your_domain/html
To test the server block settings, you will now create an example index.html page. Vi is the standard text editor included with Rocky Linux 9. Vi is a capable text editor, but for users without much experience, it might be a little confusing. Make modifying configuration files on your Rocky Linux 9 server easier. You might want to use a more user-friendly editor like nano:
sudo dnf install nano
Next, using nano or your preferred editor, make a sample index.html page as follows:
nano /var/www/your_domain/html/index.html
Add the following example HTML inside:

When you’re done, save and shut the file. When using nano, you can save your work and exit by pressing CTRL + X, followed by Y when asked, and then Enter.
You must build a server block with directives pointing to your unique web root for Nginx to deliver this content. Add the following server block to your_domain.conf in /etc/nginx/conf.d:
sudo nano /etc/nginx/conf.d/your_domain.conf
Copy and paste the configuration block shown below:
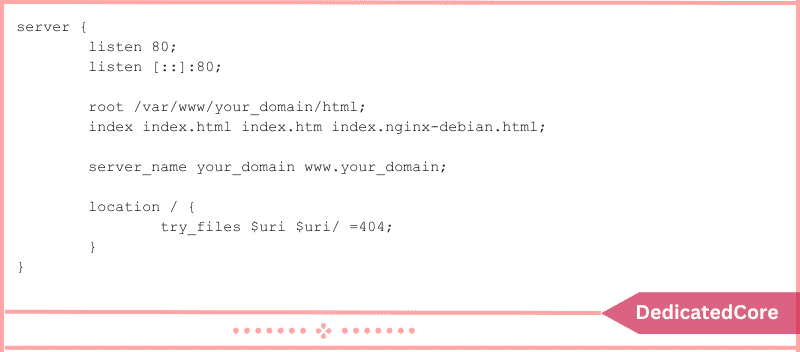
You’ll see that we changed the server_name to our domain name. Changed the root configuration to point to our new directory. Save the document, then exit.
You can learn more about how Nginx interprets these directives here. Two server blocks are now activated and set up to react to requests. Request depending on their listen and server_name directives:
- Responses to requests for both your_domain and www.your_domain are provided by your_domain.
- By default, all requests on port 80 that do not match the other two blocks will be reacted to.
Next, use nginx -t to check that none of your Nginx files have syntax problems.
sudo nginx -t
Restart Nginx to Start the changes If there are no issues:
sudo systemctl restart nginx
You must alter your server’s SELinux security contexts so that Nginx is permitted. Basically, to serves content from the /var/www/your_domain directory. Everything before you can test the modifications from your browser.
Your custom document root can now be provided as HTTP content. Because of this chcon context update:
chcon -vR system_u:object_r:httpd_sys_content_t:s0 /var/www/your_domain/
Your domain name should now be served by Nginx. You may verify this by going to http://your_domain, where you ought to see the following:
Conclusion
Your Rocky Linux 8 server now has a flexible and effective web server. That can handle a variety of activities to the successful installation of Nginx. Nginx’s performance and dependability will be helpful to you. It can be useful in many ways whether you’re hosting a website.
Controlling reverse proxies, or optimizing your online applications. You’ve set the foundation for your online projects to succeed by following instructions. Which is the first step toward a seamless web hosting experience on Rocky Linux 8.